
When working with different iterations of a SQL database running on Internal, Staging and Production infrastructure it can become a pain in the ass rolling out updates at deployment time or keeping them in sync. Developers often use third party tools to help them do this job, however depending on what version of Visual Studio you have installed, there may be another option you have overlooked, and it’s baked right into the IDE.
This post is part of a multi-part series on Visual Studio’s Database tooling. Along with an in-depth look at the database tooling, i will include ways to include these tools in your Continuous Integration Setup to help you achieve automated database awesomeness…
Visual Studio Premium upwards contains a whole heap of best-in-class tools for working with databases. One of those tools is the Visual Studio Schema comparison tool I’m going to show you today. But first a little caveat;
If you have worked with SQL databases in the production of your application, you have probably heard of the developer tool producer Red Gate. They produce a whole bunch of tools to make a windows developer’s life easy – in the case of this post specifically, they make a tool called SQL Compare that is pretty popular among the community. Red Gate’s products are far from cheaply priced (a single user license will set you back $395 as of June 2011), and in the case that you have a version of Visual Studio Premium or higher there is absolutely no reason to accept this added cost as you have the same if not better tools, sitting right in front of you!
Visual Studio Premium itself is not a cheap development tool either, however many developers have a copy of it for other features that are included in the higher level versions of Visual Studio – in the case of many MSDN subscribers that were subscribed before 2010, when updating to Visual Studio 2010 they received a free upgrade to Premium when Microsoft changed the available versions of the IDE that were on sale to simplify the decision at purchase time.
This post is not a discussion point as to whether Red Gate’s or Microsoft’s products are better, but simply how developers that own a license of Visual Studio Premium or higher can get better value from their current IDE.
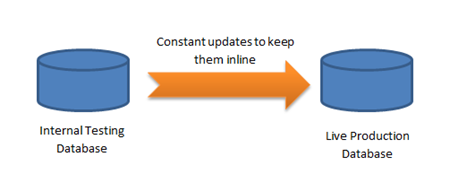
Today we’re going to look at a walkthrough of a database schema comparison. To achieve this i am going to work on an assumption that you have an internal testing database, and a live database. This is quite a common approach if you have a staging or internal version of your application for available for testing.
At this point i must make another statement: I hope this database is not the one you use as a shared development database as i strongly agree with Troy Hunt’s post The Unnecessary Evil of Shared Development Databases that this way of working is no longer in vogue. Once you have gotten the hang of the schema comparison tool I am demonstrating in this post, there will be even less reason for you to work this way, as it will be easy to keep your local version up to date with the version everyone is working with.
The problem with the approach of having a local internal/staging database is that you need to constantly push updates to your production database to keep it in synch with your in-development database as you push updates to your application into production.
The great thing about the tooling built into Visual Studio is that it allows you to easily view the differences between your internal and production databases, and then either generate a script to bring the two into alignment or update them right then and there.
Even if you do not have direct network access to your live database, the principals discussed in this post can be easily accomplished by taking a backup of your production database and restoring it locally. You can then run your comparison against this local mirrored copy.
For the purposes of this how-to I'll create two sample databases to compare between so that we have an example to run with.
We will call these two databases VersionTest1 and VersionTest2. I'll be using a local instance of SQL express, but feel free to use whatever you have at hand including your real internal and external databases if you are “feeling lucky”.
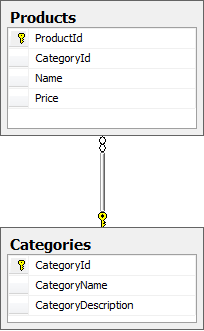
Basically the schema’s for these two databases will look like the below images. VersionTest1 will have a few more fields, as we’ll treat this like our in-house development database, and VersionTest2 will have less fields, as this will be our production/staging database that we want to bring inline with our development database.
You may think i have used a really simple example, and i would tend to agree that my lack of creativity in the use of this example is pretty crap – in my defence though most database changes will be iterative.
| Database: VersionTest1 | Database: VersionTest2 |
 |  |
Open SQL management studio and run the following SQL scripts to create these two databases and there associated tables.
CREATE DATABASE [VersionTest1] GO USE [VersionTest1] GO CREATE TABLE [dbo].[Categories]( [CategoryId] [int] IDENTITY(1,1) NOT NULL, [CategoryName] [varchar](50) NOT NULL, [CategoryDescription] [varchar](max) NULL, CONSTRAINT [PK_Categories] PRIMARY KEY CLUSTERED ( [CategoryId] ASC )WITH (PAD_INDEX = OFF, STATISTICS_NORECOMPUTE = OFF, IGNORE_DUP_KEY = OFF, ALLOW_ROW_LOCKS = ON, ALLOW_PAGE_LOCKS = ON) ON [PRIMARY] ) ON [PRIMARY] GO CREATE TABLE [dbo].[Products]( [ProductId] [int] NOT NULL, [CategoryId] [int] NOT NULL, [Name] [varchar](50) NOT NULL, [Price] [money] NOT NULL, CONSTRAINT [PK_Products] PRIMARY KEY CLUSTERED ( [ProductId] ASC )WITH (PAD_INDEX = OFF, STATISTICS_NORECOMPUTE = OFF, IGNORE_DUP_KEY = OFF, ALLOW_ROW_LOCKS = ON, ALLOW_PAGE_LOCKS = ON) ON [PRIMARY] ) ON [PRIMARY] GO SET ANSI_PADDING OFF GO ALTER TABLE [dbo].[Products] WITH CHECK ADD CONSTRAINT [FK_Products_Categories] FOREIGN KEY([CategoryId]) REFERENCES [dbo].[Categories] ([CategoryId]) GO ALTER TABLE [dbo].[Products] CHECK CONSTRAINT [FK_Products_Categories] GO CREATE DATABASE [VersionTest2] USE [VersionTest2] GO CREATE TABLE [dbo].[Categories]( [CategoryId] [int] IDENTITY(1,1) NOT NULL, [CategoryName] [varchar](50) NOT NULL, CONSTRAINT [PK_Categories] PRIMARY KEY CLUSTERED ( [CategoryId] ASC )WITH (PAD_INDEX = OFF, STATISTICS_NORECOMPUTE = OFF, IGNORE_DUP_KEY = OFF, ALLOW_ROW_LOCKS = ON, ALLOW_PAGE_LOCKS = ON) ON [PRIMARY] ) ON [PRIMARY] GO CREATE TABLE [dbo].[Products]( [ProductId] [int] NOT NULL, [CategoryId] [int] NOT NULL, [Name] [varchar](50) NOT NULL, CONSTRAINT [PK_Products] PRIMARY KEY CLUSTERED ( [ProductId] ASC )WITH (PAD_INDEX = OFF, STATISTICS_NORECOMPUTE = OFF, IGNORE_DUP_KEY = OFF, ALLOW_ROW_LOCKS = ON, ALLOW_PAGE_LOCKS = ON) ON [PRIMARY] ) ON [PRIMARY] ALTER TABLE [dbo].[Products] WITH CHECK ADD CONSTRAINT [FK_Products_Categories] FOREIGN KEY([CategoryId]) REFERENCES [dbo].[Categories] ([CategoryId]) GO ALTER TABLE [dbo].[Products] CHECK CONSTRAINT [FK_Products_Categories] GO
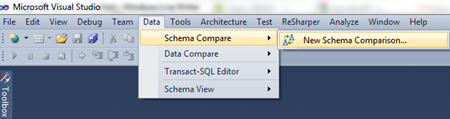
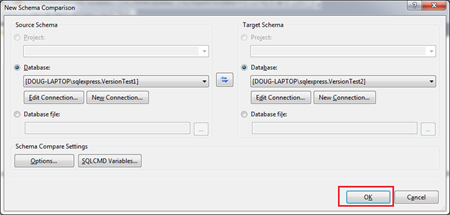
Open the schema compare tool in Visual Studio by selecting Data > Schema Compare > New Schema Comparison from the menu.
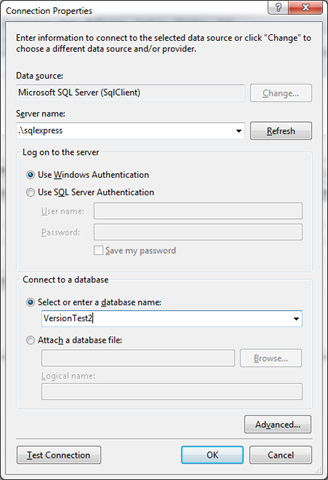
In the newly opened window create a new database connection to your source database (the database we want to compare from) and your destination database (the database we want to compare and merge the schema from the source to). For the purposes of this demo we’ll create new connections for both databases we created above.

Create a new database connection to our source database (using our above talked about internal/staging database) VersionTest1
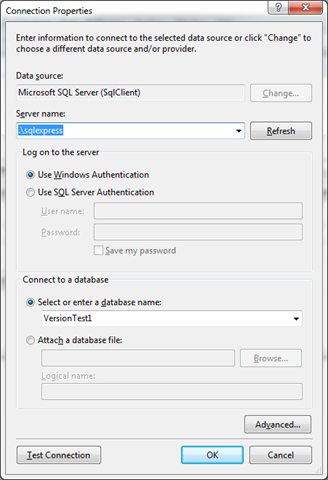
And then create a database connection for VersionTest2
Now we are ready to run our schema comparison. Hit OK and let ‘er rip;
Visual Studio will now go away and compare the two database’s schemas and work out what differences exist between the two. Once It is finished doing this comparison you will be greeted by the screen below showing our source database and our destination database:

Visual Studio shows quite clearly each item in your database and what it thinks should be done to update your destination database to match your source database’s schema. In the above instance, it is saying that it will update both of our Product and Category tables on our destination database. This is exactly that we want to happen in the situation that we were updating our production database’s schema.
![]()
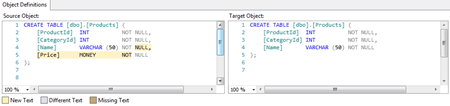
If you select either of the rows indicating a schema table in the above image, below the list of database schema items Visual Studio will show the exact change between the tables in sql script form similar to a merge tool in your favourite source control software:
If we want to avoid any of these changes, we can select the Update text section of the schema object list and a drop down appears that allows me to Skip this particular change from our final update script – pretty cool eh?

If we want to drill down even further into this change, we can see exactly what is different between the tables in a visual fashion by clicking the arrows next to each schema item in the list. This shows us a more fine-grained display of the changes between the tables, and allows us to Skip any of the changes individually.

One of the most common things that you usually want to skip is the change of filename for the database and log file, noted by the image below showing that the tool wants to drop the file and create a new one. I will be marking these all as Skip.

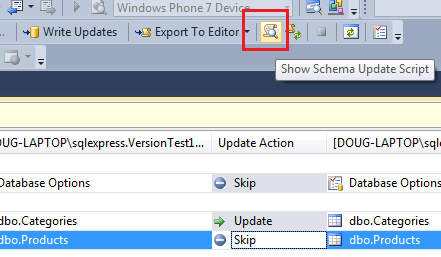
When we’ve had a bit of a play with the above to get a good outcome for our schema comparison/schema update, we can then shift to seeing a script that can be run against our destination database (in this instance the database VersionTest2) to bring it in synch, by simply clicking on the icon in the toolbar that shows the label Show Schema Update Script.
Once the Schema Update Script window shows in the bottom of the screen, we can then select the button next to the Show Schema Update Script button we used above marked Refresh Schema Script to update any changes we have made on the schema list window in the generated SQL script. Below is an example of the screen showing the schema update script

Below is the script that Visual Studio has generated from the above example:
/* Deployment script for VersionTest2 */ GO SET ANSI_NULLS, ANSI_PADDING, ANSI_WARNINGS, ARITHABORT, CONCAT_NULL_YIELDS_NULL, QUOTED_IDENTIFIER ON; SET NUMERIC_ROUNDABORT OFF; GO :setvar DatabaseName "VersionTest2" :setvar DefaultDataPath "c:\Program Files\Microsoft SQL Server\MSSQL10_50.SQLEXPRESS\MSSQL\DATA\" :setvar DefaultLogPath "c:\Program Files\Microsoft SQL Server\MSSQL10_50.SQLEXPRESS\MSSQL\DATA\" GO USE [master] GO :on error exit GO USE [$(DatabaseName)] GO PRINT N'Altering [dbo].[Categories]. '; GO ALTER TABLE [dbo].[Categories] ADD [CategoryDescription] VARCHAR (MAX) NULL; GO PRINT N'Altering [dbo].[Products]. '; GO ALTER TABLE [dbo].[Products] ADD [Price] MONEY NOT NULL;
Now that we have successfully compared our two databases, and figured out what has changed, and then taken it one step further and compiled a list of changes we’d like to make to our destination database to bring it inline with our source database’s schema we have two options:
Save My Schema Update Script
To save our schema update script for later execution in SQL management studio or to check it into source control, we have two options at the top of the window. The Export to editor button in the toolbar will take the schema script and open it in a new SQL management studio query window, and the Export to file… does exactly as it says and brings up a Save File dialog.

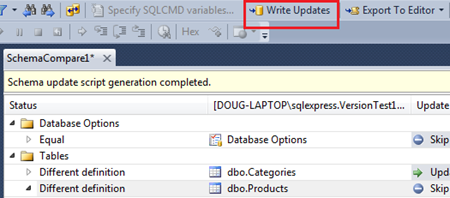
Write The Updates To Our Destination Database
Writing the updates to our destination database is even easier. Simply click on the Write updates button in the Visual Studio toolbar, and as long as the database user you are using for your database connection has the right permission to run the updates, Visual Studio will update the destination database in real time for you.
The versions of Visual Studio higher than the stock standard “Professional” edition contain a lot of extra features that developers who own them often overlook or are completely unaware of. The database tools are priceless if you are lucky enough to have a version of Visual Studio that contains them.
In the future I really hope that Microsoft includes these database tools inside the standard version of Visual Studio they release.
Next up, I’ll show you how you can automate the creation of the above database “change” script in your continuous integration setup.
Like this post? Why not share it!