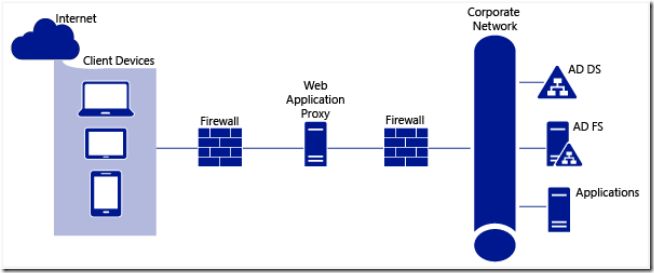


The Web Application Proxy (WAP) is a role service of the Remote Access server role in Windows Server 2012 R2. One of the primary roles of the WAP is to performs pre-authenticates access to web applications using Active Directory Federation Services (AD FS), and in this capacity the WAP functions as an AD FS proxy.
In general, WAP provides reverse proxy functionality for web applications in the corporate network which allows users on most devices to access internal web applications from external networks.
Using WAP, you can configure additional features provided by AD FS, including: Workplace Join, multifactor authentication (MFA), and multifactor access control. Also WAP can be part of a DirectAccess infrastructure deployment, or when securely publishing Exchange or SharePoint services.
Pre-requisites:
This guide will focus on publishing AD FS, and will not cover Integrated Windows authentication and Kerberos constrained delegation, and only mention that it is supported in the Web Application Proxy. The main requirements in this scenario are that the WAP servers must be domain-joined to a Active Directory with Windows Server 2012 domain controllers, and there must be trusts between a user forest and the WAP forest and to a resource forest. For additional information, see Kerberos Constrained Delegation across Domains. It is also assumed that the WAP server have only one network adapter.
It is recommended to enable proper Network Time Protocol (NTP) or another time synchronization method on all Web Application Proxy and AD FS servers.
First, install the Remote Access role and then configure the Web Application Proxy to connect to an AD FS server. This procedure must be repeated on all servers where Web Application Proxy must be deployed.
Start Add Roles and Features on the WAP Proxy server
Select Role-based or feature-based installation, and click Next
![clip_image001[11]](http://www.mistercloudtech.com/wp-content/uploads/2015/11/clip_image00111_thumb-1.png)
Click Next
![clip_image002[5]](http://www.mistercloudtech.com/wp-content/uploads/2015/11/clip_image0025_thumb-1.png)
Select Remote Access, and click Next
![clip_image003[5]](http://www.mistercloudtech.com/wp-content/uploads/2015/11/clip_image0035_thumb-1.png)
Click Next
![clip_image004[5]](http://www.mistercloudtech.com/wp-content/uploads/2015/11/clip_image0045_thumb-1.png)
Click Next
![clip_image005[5]](http://www.mistercloudtech.com/wp-content/uploads/2015/11/clip_image0055_thumb-1.png)
Select Web Application Proxy
![clip_image006[5]](http://www.mistercloudtech.com/wp-content/uploads/2015/11/clip_image0065_thumb-1.png)
Select Add Features
![clip_image007[6]](http://www.mistercloudtech.com/wp-content/uploads/2015/11/clip_image0076_thumb-1.png)
Click Next
![clip_image008[4]](http://www.mistercloudtech.com/wp-content/uploads/2015/11/clip_image0084_thumb-1.png)
Select Export configuration settings
![clip_image009[4]](http://www.mistercloudtech.com/wp-content/uploads/2015/11/clip_image0094_thumb-1.png)
Save DeploymentConfigTemplate.xml (see example in appendix)
Click Install
![clip_image010[4]](http://www.mistercloudtech.com/wp-content/uploads/2015/11/clip_image0104_thumb-1.png)
Wait while the installation is completed …
Click on the Open the Web Application Proxy Wizard link
![clip_image011[4]](http://www.mistercloudtech.com/wp-content/uploads/2015/11/clip_image0114_thumb-1.png)
Click Next
![clip_image012[4]](http://www.mistercloudtech.com/wp-content/uploads/2015/11/clip_image0124_thumb-1.png)
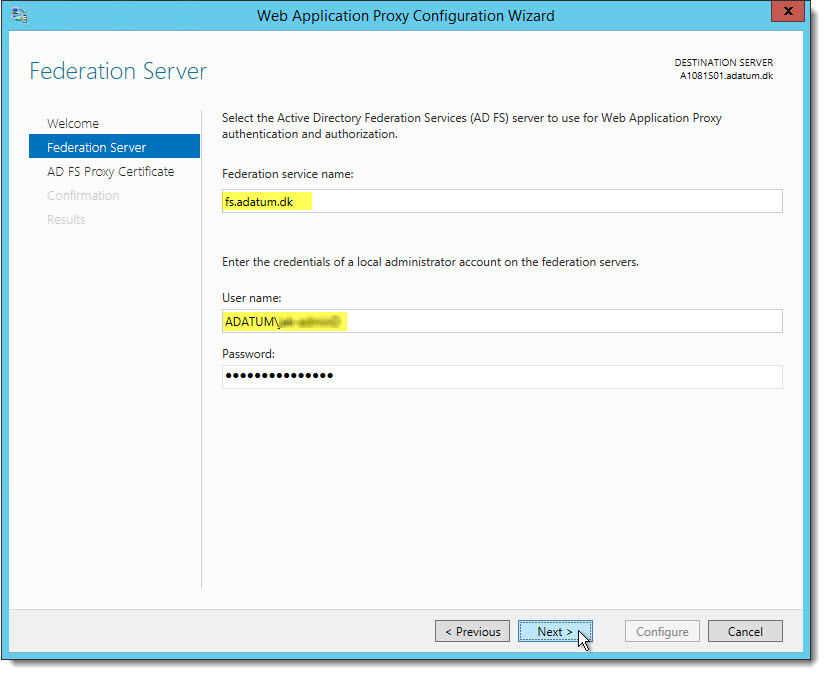
At the Federation Server page, supply the requested information:
NOTE:
These credentials will only be used once in order to create a proxy trust, and they are not stored.
Click Next
On the AD FS Proxy Certificate page, select a certificate, from the list of certificates installed on the WAP server, to be used for AD FS proxy functionality. The certificate selected here should be the one that whose subject match the Federation Service name, for example, fs.adatum.dk or *.adatum.dk.
![clip_image014[4]](http://www.mistercloudtech.com/wp-content/uploads/2015/11/clip_image0144_thumb-1.png)
Click Next
![clip_image015[4]](http://www.mistercloudtech.com/wp-content/uploads/2015/11/clip_image0154_thumb-1.png)
Click Configure
![clip_image016[4]](http://www.mistercloudtech.com/wp-content/uploads/2015/11/clip_image0164_thumb-1.png)
Wait until the WAP has completed the configuration (this may take from a few seconds to a few minutes …)
When the WAP has successfully connected to the AD FS service, verified the specified certificate and account, and completes the configuration, click Close
![clip_image017[4]](http://www.mistercloudtech.com/wp-content/uploads/2015/11/clip_image0174_thumb-1.png)
After closing the Web Application Proxy Configuration Wizard, the Remote Access Management Console will automatically open.
![clip_image018[4]](http://www.mistercloudtech.com/wp-content/uploads/2015/11/clip_image0184_thumb-1.png)
Before proceeding further, logon to any other WAP servers in the same server farm. Repeat the above described process to install Web Application Proxy. Then open the Open the Web Application Proxy Wizard link, add the Federation service and comple the initial WAP configuration.
Now, switch to the first/primary WAP server, and open the Remote Access Management Console
Create a new pass-through publishing by clicking Publish in the right menu.
![clip_image001[13]](http://www.mistercloudtech.com/wp-content/uploads/2015/11/clip_image00113_thumb-1.png)
Click Next
![clip_image002[7]](http://www.mistercloudtech.com/wp-content/uploads/2015/11/clip_image0027_thumb-1.png)
Select the Pass-through preauthentication method, and click Next
![clip_image003[7]](http://www.mistercloudtech.com/wp-content/uploads/2015/11/clip_image0037_thumb-1.png)
On the Publishing Settings page, enter this information:
| Name | ADFS |
| External URL | https:// |
| External certificate | Select the external SSL certificate, that must be used for the federation service. |
| Backend server URL | https:// |
Note:
The External and Backend server URL must be the same !
Select the External certificate:
![clip_image004[7]](http://www.mistercloudtech.com/wp-content/uploads/2015/11/clip_image0047_thumb-1.png)
Click Next
![clip_image005[7]](http://www.mistercloudtech.com/wp-content/uploads/2015/11/clip_image0057_thumb-1.png)
Click Publish
![clip_image006[7]](http://www.mistercloudtech.com/wp-content/uploads/2015/11/clip_image0067_thumb-1.png)
Wait for the ADFS Application to be published …
![clip_image007[8]](http://www.mistercloudtech.com/wp-content/uploads/2015/11/clip_image0078_thumb-1.png)
Click Close
Now the ADFS service is published in the WAP.
![clip_image008[6]](http://www.mistercloudtech.com/wp-content/uploads/2015/11/clip_image0086_thumb-1.png)
NOTE:
With multiple WAP servers, setup in a NLB cluster, it is only required to make the publication on the primary server. The remaining NLB cluster nodes will get the configuration automatically, simply press Refresh in the Remote Access Management Console, after the pass-through application is published.
Verify the Operations Status, and the servers are working as expected.
![clip_image010[6]](http://www.mistercloudtech.com/wp-content/uploads/2015/11/clip_image0106_thumb-1.png)
The WAP must now be made accessible from the Internet, by adding a Host A record in the public DNS zone, which point the federation service name (fs.adatum.dk) to the public IP of the WAP listener.
Last, verify that https://fs.adatum.dk/adfs/ls/IdpInitiatedSignon.aspx is available and working from the public Internet (modify the URL to your domain!).